Resizing Images Without Losing Quality
We all need perfect images for our projects. Too big or too small does not fit. The right size with a clear view is what we all want. So, we need to resize images without losing the quality, which means the picture should not look blurry or pixelated. Resizing images is the only solution.
In this article, I will discuss with you how to resize images perfectly for your projects.
Large images takes longer time to upload and also require lots of storage. Resizing them will upload faster and can help you save space. Additionally, smaller images are easily shared through social media platforms. It is always better to have uniform image sizes. However, different social media platforms have specific image size needs. So, you need to resize an image that suits your projects.
Whether you are a designer or a blogger, get eye-catching visuals by resizing your images at https://safeimagekit.com/image-resize.
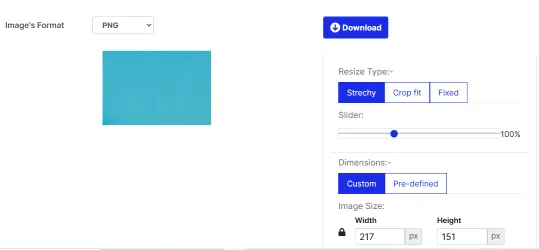
- Resize Type
You need to select the resize type. Most of the online tools offer stretch, crop fit, and fixed size options.
- Crop Fit: This will keep the original aspect ratio and crop out the extra parts to make it fit perfectly.
- Fixed Size: This will resize to the exact dimensions you specify. Further, you can change the background color to fill in gaps.
- Stretch Type: Resize to fit new dimensions. However, you need to be careful while choosing the dimensions, as this may distort your image.
- Choose Slider for Fine Control
Many online tools let you slide from 0% (smaller) to 100% (original size). Moving it carefully allows you to resize proportionally.
- Customize Dimensions or Pick Predefined Sizes
You can either choose exact dimensions or a standard size for a specific platform. You can also enter custom dimensions or select frompreset options to make it easier.
- Choose the Appropriate Format
Your images might be in PNG, JPG, WebP, or GIF. Most resizing tools support these formats to resize your images.
- Resize Multiple Images at Once
If you have bulk images, then bulk resizing is required as it saves time and makes everything uniform. You need not resize each image separately. Visit our https://safeimagekit.com/multiimage-resizer and resize images in bulk.
- Resizing for Social Media Platforms
For all your social media needs, it’s essential to tailor your images for each platform, like Instagram, Facebook, Twitter, LinkedIn, and more. Instead of browsing multiple tools or wasting time manually resizing your images, you can conveniently find everything you need in one place. Our website, https://safeimagekit.com/social-media-resizer, offers a comprehensive solution where you can easily resize and optimize your images specifically for each social media platform. This all-in-one tool simplifies the process, saving you time and ensuring your visuals look perfect across all your social channels. Whether you’re creating content for Instagram stories, Facebook posts, Twitter banners, or LinkedIn profiles, our social media resizer has got you covered with user-friendly features designed to meet all your image resizing needs seamlessly.
Things to Keep in Mind Before Resizing
- Always keep the original copy for backup, as sometimes quality loss may happen while resizing.
- Do not resize the image too much. Making a small image larger will make it blurry or pixelated.
- Choose a quality image to resize for better output.
Note
There are many online tools on the internet. What needs tobe chosen depends on individual preferences. As many resizing tools are free and easily accessible, I prefer my personal or professional images to be safe.
Conclusion
Resizing images isn’t just about making them smaller or bigger; it’s about doing it smartly so your pictures stay clear and attractive. Whether you’re preparing images for your website, social media, or just cleaning up your photo collection, knowing how to resize properly can make a big difference.
So next time you need to resize an image, remember these tips: pick the right resize mode, preview your work, and feel free if you are visiting safeimagekit.com. With the right tools and a bit of practice, your images will always look their best.